Official firmware for explay phones. Explay Fresh - smartphone firmware. Additionally. Google Services
Flashing the gps navigator explay is as easy as flashing any other navigator. To update the firmware, absolutely no knowledge and professional PC skills are required, the firmware is exactly the same as with. All you may need is detailed instructions and strict adherence to them. We will provide it.
Preparing to flash the explay navigator
Take the navigator and connect it to a personal computer through a special cable supplied in the kit. You will have a new external device on your computer.

Open it and you will see the Navitel folder, now we need it. Just click on it and drag it to your desktop or any other place on your PC, wait until all the files are copied. In this way, the firmware starts
Go to the site "navitel.ru" and register. After registration, enter your personal account and download the program for updating the firmware in the "download" section. And just follow the instructions of the program.
But this option is currently ineffective, the automatic update program is running in test mode and there may be problems. We will do the old but reliable way.
Go to the site in the section "My devices" and add your navigator. You can find the license key by temporarily disconnecting the navigator from the PC and go to the navigator (section about the program, about, or something like that). Enter the key in the field and confirm the device registration. Now you have several firmware versions available for manual updating. Scroll through the list and find your device in the list. Download firmware.
Replacing the firmware in the explay navigator
Unzip the downloaded firmware with any archiver. After unzipping, you should have a Navitel folder. Copy it to the root folder of the navigator. You will be prompted to replace all old files, constantly agree to overwrite. Wait for the copy to complete.

Now safely disconnect the navigator from the computer and check the installation of the new firmware. If everything is done correctly, when you download Navitel, you will have a new firmware version.

Note! If you encounter errors during the operation of the navigator, it means that you either have little free memory or are not flashed correctly. In the first case, it is enough to copy the folder that you previously saved on your PC to the device. According to the same principle, the Pioneer navigator is flashed.
Do you constantly travel and there is no good Internet anywhere? Tired of catching catching sticks? There is a solution -
How to flash Explay Rio on a new version of android OS? Step-by-step, detailed instructions for flashing an Explay Rio phone to a new version of the Android OS or custom firmware, as well as obtaining Root superuser rights.
1. Preparing the Explay Rio smartphone for firmware
1.1 The very first thing to do is download the phone drivers (for Win 7 or Win 8) to your PC and then install them.
1.2 After the successful installation of the drivers, download the Flash Tool 3.20 programmer for flashing the phone Explay Rio
1.3 Then download to your PC the firmware for the Explay Rio phone itself, official 4.4 or custom (recovery for Explay Rio)
1.4 We connect the phone to the PC using the supplied USB cable. The computer should automatically start the process of installing and debugging additional drivers to connect your smartphone to the PC. Upon completion of all processes, disconnect the smartphone from the PC.
2. Firmware Explay Rio
2.1 Run as administrator, flash driver program, SP Flash Tool 3.20. a window like this should appear
 SP Flash Tool Firmware->Upgrade
 2.2 In the upper left corner, we find the inscription “Options”, click on it and select “USB mode” in the drop-down menu, that is, work through the USB port
2.3 Next, in the SP Flash Tool program, click on the “scatter-loading” button, and select the “MT6272_Android_scatter_emmc” file in the folder with the firmware
2.4 We make sure that we do not have a check mark on “DA DL All With Check….” and click “Firmware-upgrade”
2.5 Turn off the phone (for reinsurance we distort the battery), connect off smartphone Explay Rio to a computer using a USB cord and do not touch anything, the firmware will start automatically. At the bottom of the program, you can watch the progress of the firmware of your animal in the form of a strip
 SP Flash Tool - Flash
 2.6 We are waiting for the appearance of a square with a green circle (this means that the firmware was successful), close it, disconnect the smartphone from the computer.

2.7 That's it, your Explay Rio smartphone will be flashed to a new firmware.
3. Getting Root superuser rights on Explay Rio
How to get Root on Explay Rio? Very simple, using the Framaroot program.
An Android app called Framaroot that allows you to root your some Android smartphones/tablets are literally one click away. The application allows you to install Superuser and SuperSu on smartphones / tablets without using a personal computer. Not all devices are supported.
All that is required to get root rights using Framaroot is to copy the APK file to the device's memory and run the application.
3.1. Download the Framaroot program (you can directly to your phone or copy it to the root of the memory card. Do not forget to allow installation of applications from unknown sources in the device settings).
3.2 On the Explay Rio phone, through any file manager, install the program through the Framaroot.apk file and click “Allow” if the antivirus issues a security risk warning. Choose "Install SuperSU" to get root rights, "Remove Root" to remove root rights or "Run script" ( for experienced users only!). If, when you launch the application, the message “The device is not vulnerable” appears in the pop-up window, uninstall the application and look for another way.
3.3 Click Gimli, Sam, Frodo, Legolas, Aragorn, Gandalf, Boromir, Barahir or Faramir, i.e. any exploit available for your device. If it doesn't work with one exploit, try another.
3.4 A window with a funny smiley appeared :-), it means that root-rights have been obtained successfully.
The Explay Fresh smartphone is one of the most successful and widespread models of a popular Russian brand offering various mobile devices. In the article, we will consider the system software of the device, or rather, the issues of updating, reinstalling, restoring and replacing with more current versions of the operating system, that is, the Explay Fresh firmware process.
Possessing generally standard and minimally acceptable technical characteristics by today's standards, the phone has been quite adequately fulfilling its functions for several years and satisfies the requirements of users who use the device for calls, communication in social networks and instant messengers, and other simple tasks. The basis of the hardware of the device is the Mediatek platform, which involves the use of well-known methods for installing system software and fairly simple tools.
The firmware of the device and the operations accompanying the process are carried out by the owner of the smartphone at his own peril and risk. By following the recommendations below, the user is aware of their potential danger to the device and takes full responsibility for the consequences!
Before moving on to using tools whose task is to overwrite Explay Fresh system partitions, the user needs to prepare the smartphone and computer that will be used for flashing. In fact, proper preparation is 2/3 of the whole process, and only with its scrupulous implementation can one count on an error-free process and a positive result, that is, a flawlessly working device.

Drivers
Despite the fact that Express Fresh is defined as a removable drive without problems and additional user actions,

installation of a special system component necessary for pairing the device in firmware mode and a PC is still required.

Installing the firmware driver usually does not cause difficulties, just use the instructions and the package for auto-installing components for flashing MTK devices "Preloader USB VCOM Driver". Both the first and second can be found in the material on our website, available at the link:

In case of problems, use the package downloaded from the link below. This is a set of drivers required for manipulations with Explay Fresh for x86-x64-OS Windows, containing an installer, as well as manually installed components.

As mentioned above, installing drivers for a smartphone is not difficult, but in order to verify the installation is correct, you will have to take some additional steps.


Superuser rights
In fact, you don't need to be rooted to flash Explay Fresh. But if the procedure is carried out correctly, a preliminary backup of the system partitions will be required, which is possible only with privileges. Among other things, the rights of the Superuser make it possible to fix many problems with the program part of the Express Fresh, for example, to clear it of "junk" pre-installed applications without reinstalling Android.


backup
Before flashing any Android device, you must create a backup copy of the information contained in it. After obtaining Superuser rights to Explay Fresh, we can assume that there are no obstacles to creating a backup. Use the recommendations from the material at the link below and gain confidence in the safety of your own data.

Let us consider in more detail the procedure for removing a dump of one of the most important sections of any MTK device - NVRAM. This memory area contains information about the IMEI, and its accidental damage when manipulating the smartphone's system partitions can lead to network inoperability.
With no backup NVRAM recovery is a rather complicated procedure, so following the steps below is highly recommended!
The popularity of the MTK hardware platform has led to the emergence of many tools for partition backup NVRAM. In the case of Explay Fresh, the fastest way to backup the IMEI area is to use a special script, the archive with which can be downloaded from the link:

Flash driver
Almost all methods of Flash Fresh firmware to one degree or another involve the use of a universal tool for operations with memory sections of devices built on the Mediatek platform - SmartPhone Flash Tool. The description of the Android installation steps in this article assumes that the application is present on the system.


Firmware
The technical characteristics of Express Fresh allow you to run and use the capabilities of almost all versions of Android, including the latest ones. The methods described below are a kind of steps towards obtaining the most modern system software on the device. Performing the steps described below one by one will allow the user to gain knowledge and tools that will subsequently make it possible to install any type and version of the firmware, as well as restore the smartphone's performance in the event of a system crash.

Method 1: Official version of Android 4.2
The SP Flash Tool described above is recommended for use as a tool for installing the Explay Fresh system, including by the smartphone manufacturer itself. The steps below involve the installation of absolutely any version of the official OS in the device, and can also serve as instructions for restoring software-inoperative smartphones. As an example, let's install the official firmware version 1.01 on a smartphone, based on Android 4.2.

- First of all, download the software package:
- Unpack the resulting archive into a separate directory, the path to which does not contain Cyrillic characters. The result will be a folder containing two directories − SW And "AP_BP".

Images for transferring Explay Fresh to memory, as well as other necessary files, are contained in the folder SW.
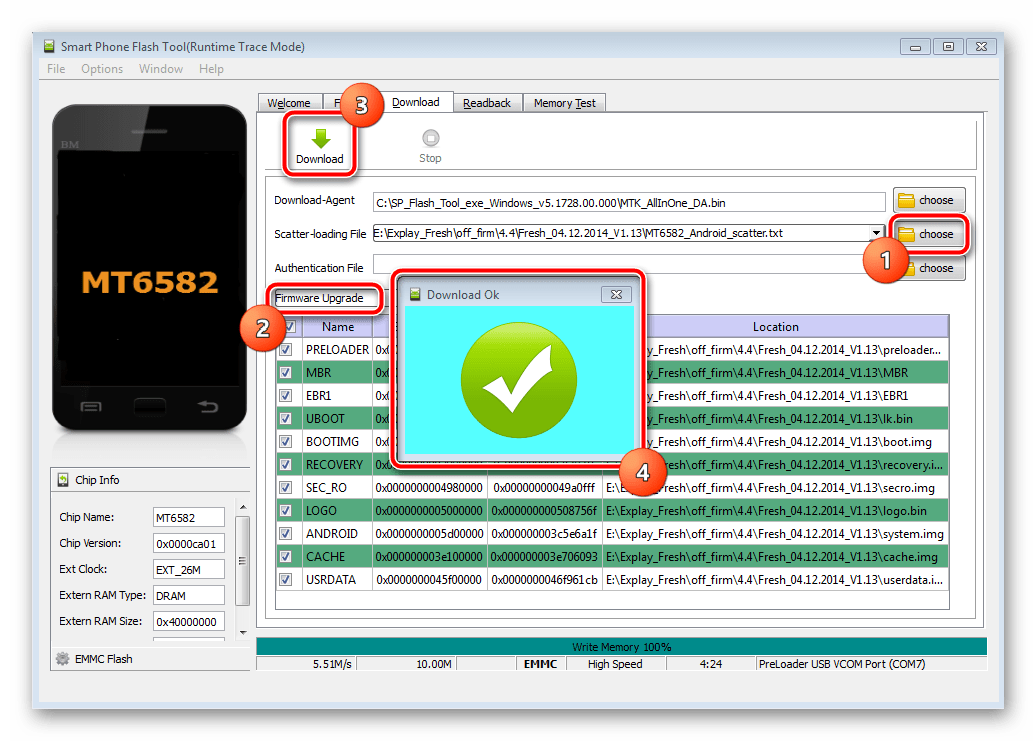
- Launch SP Flash Tool and press the key combination "Ctrl" + "shift" + "O". This will open the application options window.
- Go to section Download and check the checkboxes "USB Checksum", "Storage Checksum".
- Close the settings window and add the scatter file to the program MT6582_Android_scatter.txt from a folder SW. Button "choose"- file selection in the Explorer window - button "Open".
- The firmware should be carried out in the mode "Firmware Upgrade", select the appropriate item from the drop-down list of options. Then press the button Download.
- Remove the battery from Explay Fresh and connect the device without battery to the USB port of the PC.
- The transfer of files from the software to the system partitions will start automatically.
- Wait for the window to appear "Download OK" confirming the success of the operation.
- The installation of the official Android 4.2.2 is completed, disconnect the USB cable from the device, install the battery and turn on the device.
- After a rather lengthy first boot, perform the initial system setup.
- The device is ready for use!


Method 2: Official version of Android 4.4, recovery
The latest official version of the system provided by Explay for the Fresh model is V1.13 based on Android KitKat. It is not necessary to hope for updates due to the long period since the release of the device, therefore, if the purpose of the reinstallation procedure is to obtain an official OS, it is recommended to use this particular version.

Update
If the smartphone is working properly, then the procedure for installing V1.13 through FlashTool completely repeats the installation of V1.01 based on Android 4.2. Follow the same steps as above, but use the new version files.


To learn more about how to use the modified TWRP recovery, follow the link below and check out the material:
Android 5.1
When choosing the Explay Fresh software shell, based on the fifth version of Android, you should first of all pay attention to solutions from well-known teams developing custom firmware. In terms of popularity among users, CyanogenMod occupies one of the first places, and for the device in question there is a stable version of the 12.1 system.

This solution works almost flawlessly. Download the package for installation via TWRP:
- The resulting zip package, without unpacking, place in the root of the MicroSD installed in the Express Fresh.
- Boot into TWRP.
- Before reinstalling the system, it is highly advisable to make a backup copy of the already installed OS.
Pay special attention to the presence of a custom backup partition before installing NVRAM! If the method of obtaining a partition dump described at the beginning of the article was not used, it is imperative to make a backup copy of this area via TWRP!

- Format system partitions. Select an item Wipe on the main screen of the environment, then press the button "Advanced Wipe".

Check all checkboxes except "External SDCard", and then slide the switch "Swipe to Wipe" to the right and wait for the cleaning to complete. At the end of the procedure, go to the TWRP main screen by pressing the button Home.
- Install CyanogenMod using the item Install. After switching to this item, a screen for selecting a file for installation will open, on which press the media selection button SELECT STORAGE then tell the system "External SD card" in the window with the switch for memory types, and then confirm the selection with the button OK.

Specify a file cm-12.1-20151101-final-fresh.zip and confirm that you are ready to start installing the custom OS by moving the switch "Swipe to install" to the right. The installation procedure does not take much time, and upon completion, the button will become available. REBOOT SYSTEM, click it.
- It remains to wait for the download of custom Android and the initialization of the installed components.
- After defining the main parameters of CyanogenMod

the system is ready for operation.


Android 6
If upgrading Android version to 6.0 on Explay Fresh is the goal of flashing the device, pay attention to the OS Resurrection Remix. This solution has absorbed all the best from the well-known CyanogenMod, Slim, Omni products and is based on the Remix-Rom sources. This approach allowed developers to create a product that is characterized by stability and good performance. Notable are the new customization settings for Explay Fresh, which are not available in other customizations.

You can download the package for installation in the device in question at the link:
Installing Resurrection Remix follows the same steps as installing CyanogenMod above.


Android 7.1
After carrying out the above procedures, which involve installing custom firmware based on Android Lollipop and Marshmallow, we can talk about the user gaining experience that allows you to install virtually any modified skins in Express Fresh. At the time of writing this material, solutions based on the new Android 7 version have been released for the model.

This is not to say that these custom work flawlessly, but it can be assumed that the development of modifications will continue, which means that sooner or later their stability and performance will reach a high level.
An acceptable and practically trouble-free solution based on Android Nougat, at the time of writing, is the firmware Lineage OS 14.1 from the successors of the CyanogenMod team.

If you want to take advantage of the new Android, download the OS package for installation via TWRP:
Installing LineageOS 14.1 on Express Fresh should not be difficult. Actions that result in the installation of a modified OS are standard.


Additionally. Google Services
None of the above unofficial systems for Express Fresh carries Google applications and services. To get the Play Market and other familiar features, use the package offered by the OpenGapps project.

Instructions for obtaining system components and installing them are available in the article at the link:
Summing up, we can state that the software part of Explay Fresh is restored, updated and replaced quite simply. For the model, there are many firmwares based on different versions of Android, and installing them allows you to turn a generally good device into a modern and functional solution, at least in terms of software. Successful firmware!
Owners Explay fresh: Updating the firmware is a responsible matter and therefore requires good reasons and circumstances. And there are not so many reasons for this action, although it happens that this is the only opportunity for further use of the smartphone. The software of the device is also very often updated in order to improve its performance and characteristics. But first you need to download the software. You will need drivers, a firmware program on a computer SP Flash Tool - v5.1408.00 and one of the 4 firmware versions - v1.00-01 (4.2.2) And v1.10-13 (4.4.2)- (links at the bottom of the page). True, the firmware data is now not available on the official support site Explay, because this manufacturer has self-destructed and now all users of mobile devices Explay left alone with their problems.
Warning: By updating the software yourself, you run the risk of rendering it inoperable. Doing so may void your device's warranty. Update the firmware only if you know exactly what you are doing and are fully aware of the risk...
Additionally: Before flashing, save all the necessary information,
since in the process of flashing all data will be erased!
After downloading and extracting the files to PC, install all the necessary drivers to flash your smartphone. You may have to select the driver yourself, then you need to install it depending on the operating system installed on the computer (for XP - USB VCOM Driver).
Instructions for installing drivers on Windows 7(and for Windows XP Pretty much the same with a few minor exceptions. . )
Installing Drivers - the most crucial stage of the firmware process:
1. Open the menu - Start and in line - Find enter - hdwwiz(for Windows XP - hdwwiz.cpl). .
3. In the next window - select the item - Show all devices. Further -
4. In the next window - Install read from disk. An additional window opens where you need to specify the path to the driver file (which is located in the downloaded directory on the computer) - USB VCOM Driver > Win7 > usb2ser_Win764 (in my case Windows 7 64-bit) and then in the list of devices that appears, select - MediaTek DA USB VCOM Port. Press - Further.
5. The driver will be installed and new hardware will appear - MediaTek DA USB VCOM Port).
The most important thing is to choose the right file with the required bit depth of the installed operating system on your computer. And personally, I spent the firmware process ( Windows 7 64-bit) with this driver installation.
There are two videos with smartphone firmware Explay Fresh(with links to this page) programs - SP_Flash_Tool_v3.1320.0.174 And SP Flash Tool - v5.1408.00. Now on support site Explay only SP Flash Tool - v5.1408.00 and therefore, first about the firmware process with this version of the program.
Firmware with SP Flash Tool - v5.1408.00
Run SP Flash Tool. Click the button - and specify the path to the file — MT6582_Android_scatter in the firmware directory.
Next, click on the dropdown list and select − Firmware > Upgrade(this is in the case of firmware with the same version or upgrade). When flashing downgrade (from v1.13 to v1.00), only the choice worked for me - Format All + Download. But at the same time, there is a high probability that they will disappearIMEI ( I personally almost never use version 5, but prefer SP_Flash_Tool_v3.1320.0.174)

Then click on the button above - Download and connect the switched off phone with a USB cable to the computer. The firmware process should begin.

Which will end in a few minutes if successful with such a picture.

Firmware with SP Flash Tool - v3.1320.0.174
Turn on the program SP_Flash_Tool_v3.1320.0.174 and the following interface will open in front of you: Click - Options and check that there is a tick in front of - USB mode.


Connect your smartphone Explay Fresh off with a USB cable to
computer. After the above steps, the firmware should automatically start.
Upon successful completion of the software update process, the following window will appear:

After updating to Settings no item - For developers. For it to appear, you need to open the tab - About phone and click on the build number 7-10 times. A short message appears and then Settings a new item appears For developers, where there is an additional set of tools for working with the Android system installed on this smartphone.
Download page for some software (program for firmware, firmware) for Explay Fresh from the site cloud.mail.ru - HERE (link temporarily unavailable)
Firmware, firmware and instructions for Explay Vega
Program for flashing Explay Vega -
The stock communication module that is included in 4.4.2 -
Stock communication module, which is included in 5.0 - - Installed through custom recovery
Custom firmware - - Stitched through custom recovery
WinXP-win7 application for getting root, creating a backup, restoring IMEI and much more.
So just in case you get stuck.
An application on a computer to obtain ROOT rights on android smartphones.
Instructions for installing unofficial firmware through custom recovery:
- You must have custom recovery installed
- Download the archive with the firmware to the root of the sd card
- Turn off the phone
- Hold down the vol. + keys and the Power button at the same time
- Select WIPE DATA/FACTORY RESET (CONFIRM YES...)
- Select WIPE CACHE PARTITION (CONFIRM YES...)
- Select install zip from sd card
- Select the item choose zip from sd card
- Select the archive with the firmware
- A menu will appear - click yes
- We are waiting for the firmware to be installed
- Next, select reboot system now
Instructions for installing firmware through a computer:
Attention! Before flashing, save all the information that you need, because during the flashing process all data will be deleted!
1. Install all the drivers required to flash the device
If the device prompts you to select a driver yourself, then install it depending on your OS (for example, for XP)
2. Turn on the Smart Phone Flash Tool (Runtime Trace Mode)
You will see the following interface in front of you:


4. In the folder with the firmware, you need to select a file called MT6592_Android_scatter, for example.